
WHAT IS A2P 10 DLC?
A2P 10DLC refers to a system in the United States that allows businesses to send Application-to-Person (A2P) type messaging via standard 10-digit long code (10DLC) phone numbers. Carriers in the US consider all LC Phone traffic to be A2P. Carriers’ A2P 10DLC offerings provide better delivery quality and lower filtering risk than long code SMS of the past, using the same phone numbers.
How does A2P 10DLC work?
There are two important requirements under the new A2P 10DLC system:
Businesses must identify who they are to the carrier networks (Brand registration).Businesses must register what type of messages they send, i.e., notifications (Campaign registration).
Registration is done entirely through LC Phone System Trust Center. We have integrated with The Campaign Registry (TCR) to meet carriers' requirements while making it easy for businesses to onboard. Please see how I register to use A2P 10DLC messaging for additional guidance.
How does US A2P Brand registration work?
When you complete your US A2P Brand registration, your Brand will receive a Trust Score from 0 to 100. This rating influences the maximum message throughput that will be allocated to each of your Campaign use cases (see below).
Required information for United States A2P 10DLC registration
Low-Volume Standard Brands
Each business will need the following information to register for A2P 10DLC. This means you must collect this info for your customers if you are a direct brand.
Business Information: **ALL OF THE MENTIONED BELOW ARE REQUIRED
Business Name
Physical Address (Street, City, State/Province/Region, Postal Code, Country)
Business Identity (Direct Customer or ISV/Reseller/Partner)
Business Type (Sole Proprietorship/Partnership/Corporation /Co-Operative/LLC/Non-Profit)
Company Status (Private/Public)
Business Registration Number & Type (EIN for US-based companies, other business identifiers for non-US companies)
Industry
Website
Regions of Operations
Points of Contact
An authorized representative with the following info:
Name
Title
Phone Number
Job Position (Director/VP/GM/General Counsel/CEO/CFO)
A second point of contact may also be provided but is optional.
Sole Proprietor Brands
Sole Proprietor registration is available now. The following requirements will apply.
No Tax ID (EIN):
To qualify for Sole Proprietor registration, you must not have an EIN (Employer Identification Number). Any business with a Tax ID (EIN) is not eligible and should instead register for a Low Volume Standard Brand.
US or Canada only:
Sole Proprietor Brands are limited to individuals in the US and Canada.
How long does it take to get registered?
A2P 10DLC registration is a multiple-step process that includes registering a Business Profile, a US A2P Brand, and a Campaign use case.
Brand registration can typically be completed in a few minutes if you've collected all the required information. For example, when registering a US-based business, you should ensure your Employer Identification Number (EIN) is ready when you begin registration. However, in the event that there is a discrepancy with the information you provide, a manual review may be required for Secondary Vetting, which can take up to 7 days.
A2P REGISTRATION: VISUAL GUIDE
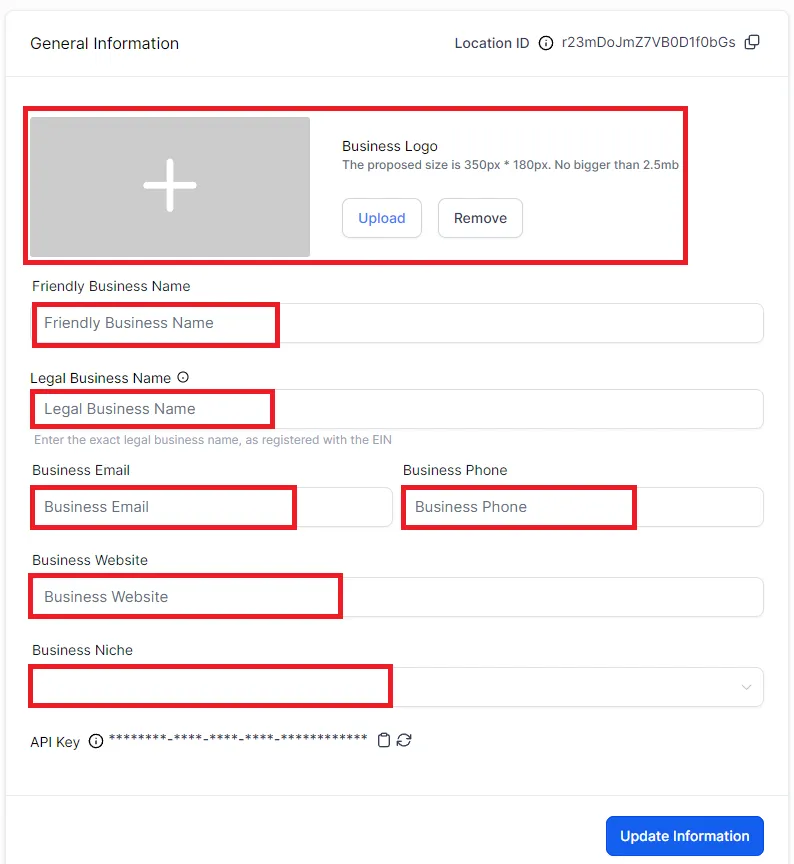
Start by heading over to Settings -> Business Profile. Starting with the 'General Information' section, fill up the information highlighted in red. Make sure that the information is accurate and based off your actual legal business documents (CP575). The same information will be reflected on the actual A2P registration window. Click 'Update Information' once finished.
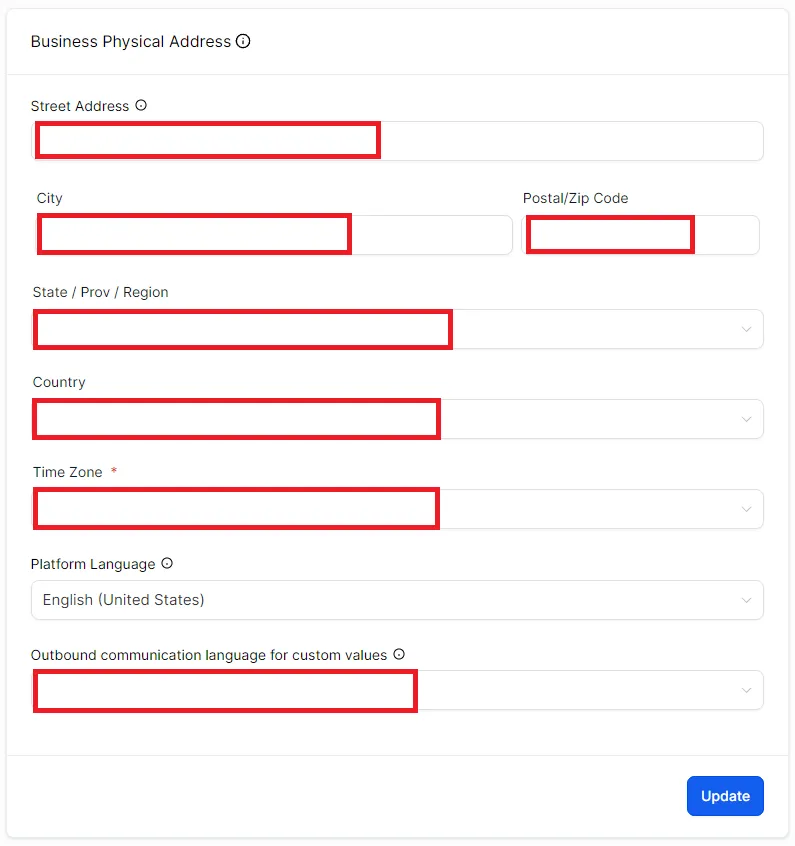
Likewise for the Business Physical Address, fill out the information accurately (where your business is located, do NOT use your personal location). Click 'UPDATE' when done.
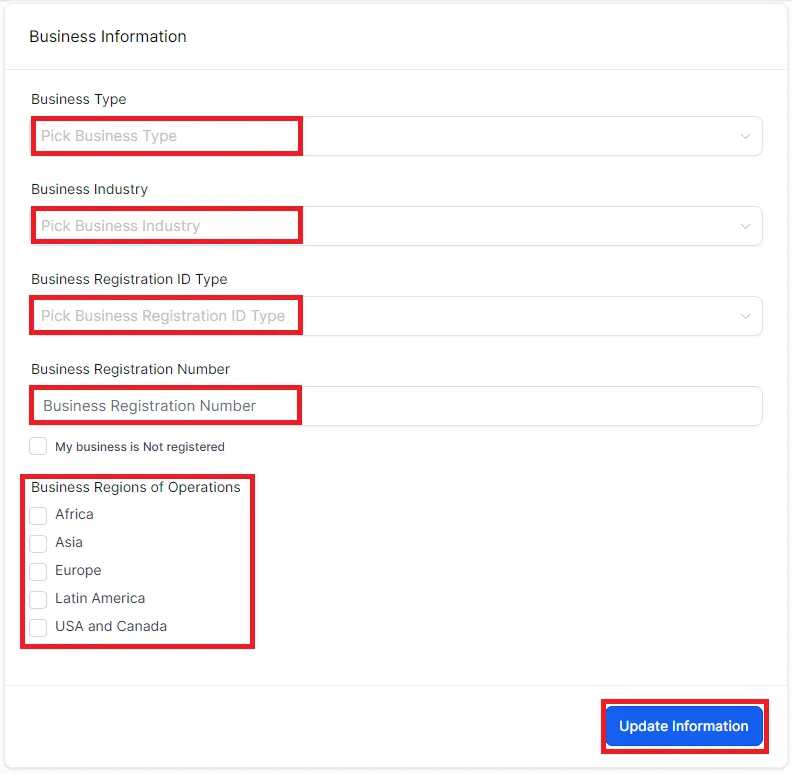
Again for the Business Information, fill out the fields marked in red ACCURATELY. If your business is not registered and you are running a sole proprietorship business, check the box where it says 'My business is not registered.' and then click 'Update Information' once completed.
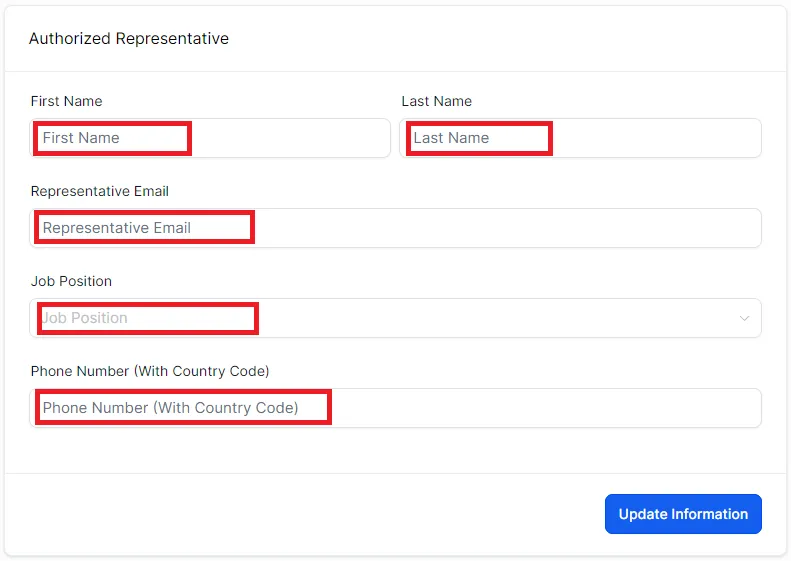
On the Authorized representative section, you can either choose yourself as the authorized representative or someone else. Click 'Update Information' once done.
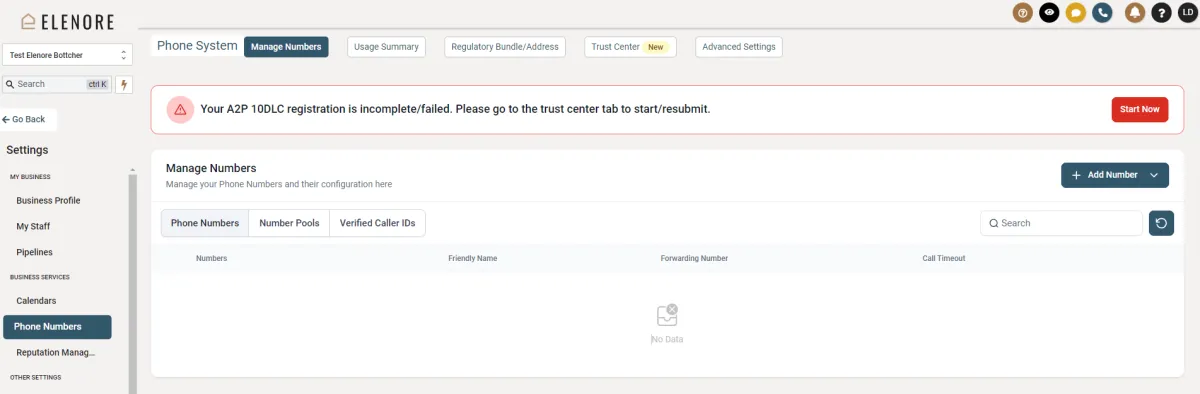
After filling out the required fields and clicking the 'Update' button on each one, on the navigation panel by the left side, head over to the Phone Numbers. You should see this page.
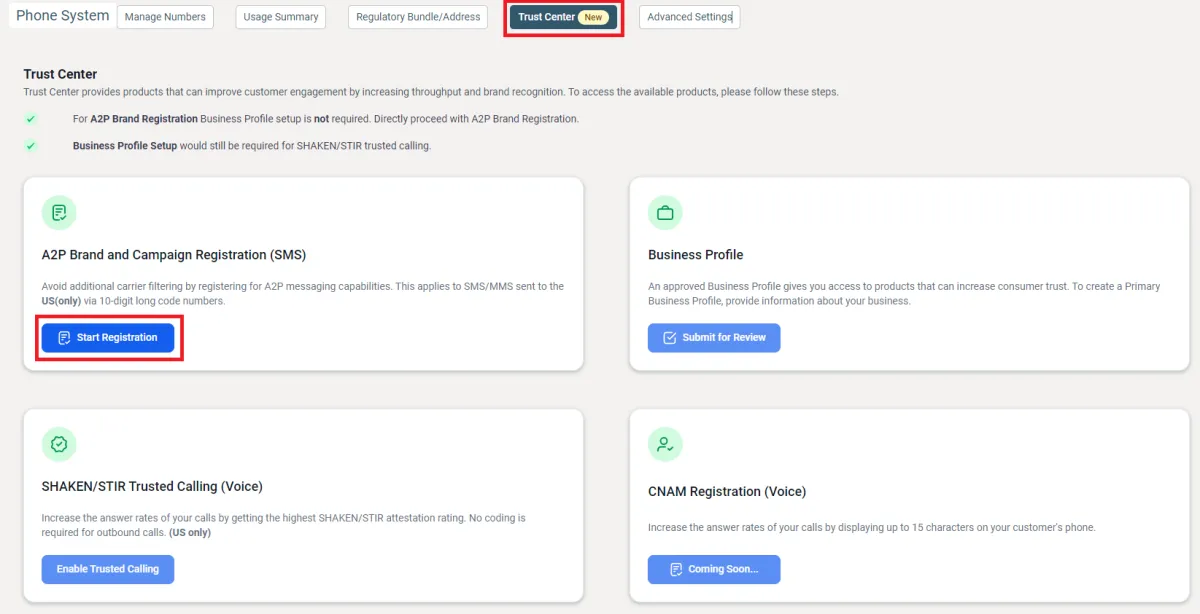
After that, head on over to the 'Trust Center (NEW)' and click 'Start Registration' to get the A2P Registration started. This should pop out a series of windows confirming the information you've laid out from the Business Profile page. Use this time to double check on every single information you have put in there before clicking 'Next' on each one.
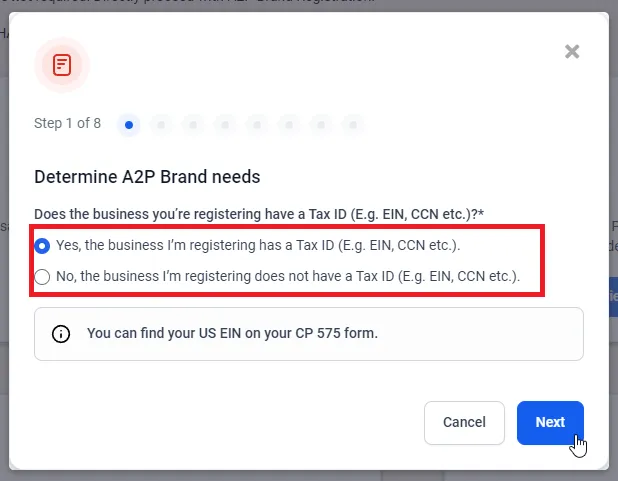
If you have previously checked the box that says 'My business is Not registered', select the 'No, the business I'm registering does not have a Tax ID'. Otherwise select the first option, then click 'Next'.
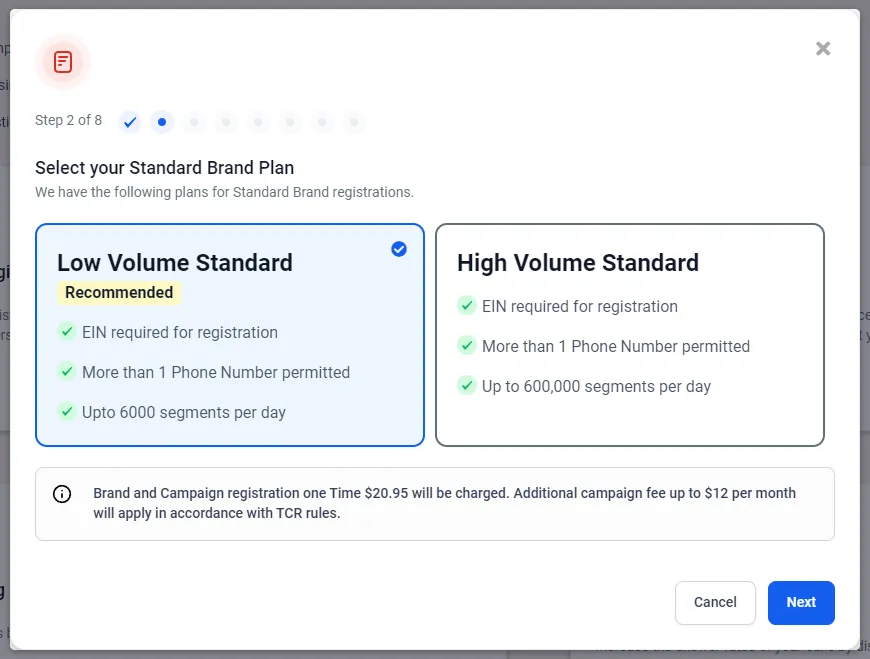
Select the Standard Brand Plan that works for you, if your business doesn't run a massive operation calling thousands of people per day (and I mean numbers reaching up to 6000+), then go with the default option, 'Low Volume Standard'. Then click 'Next'
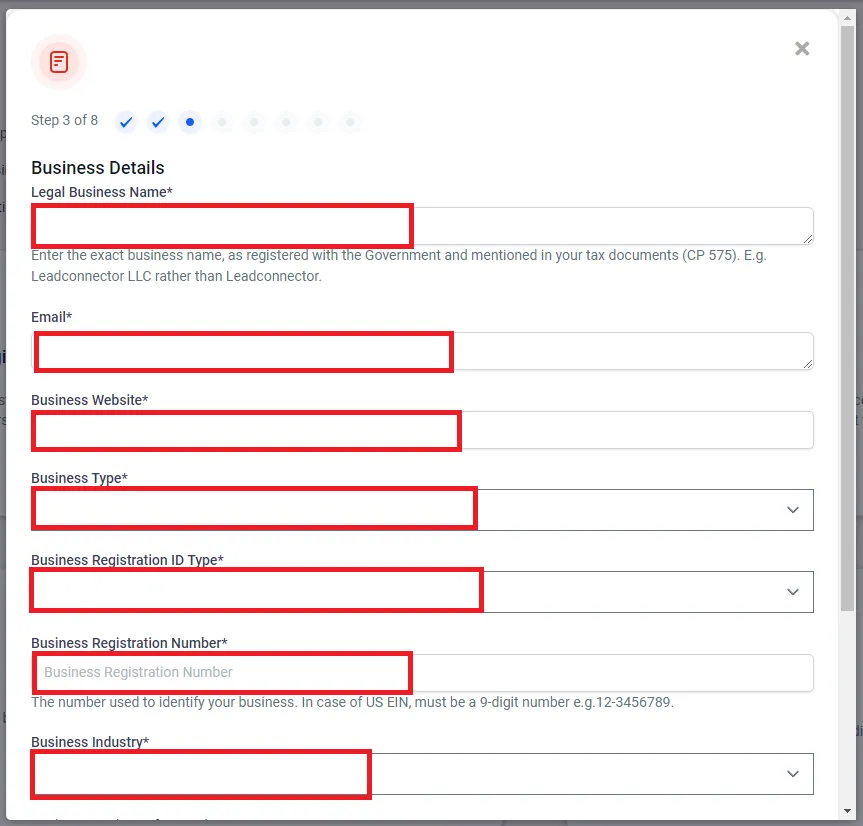
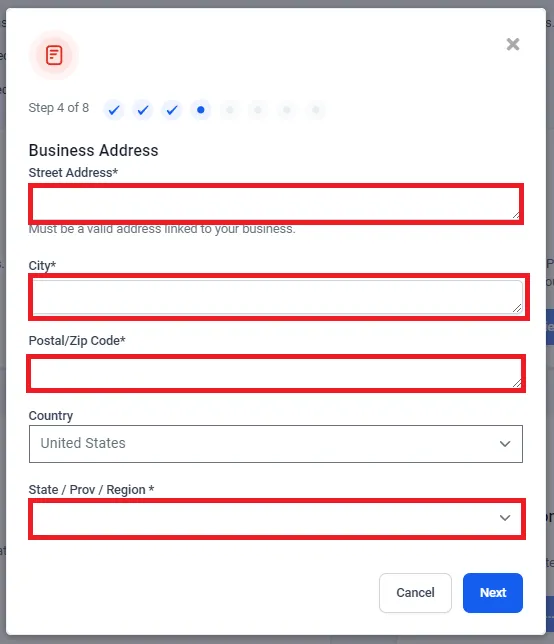
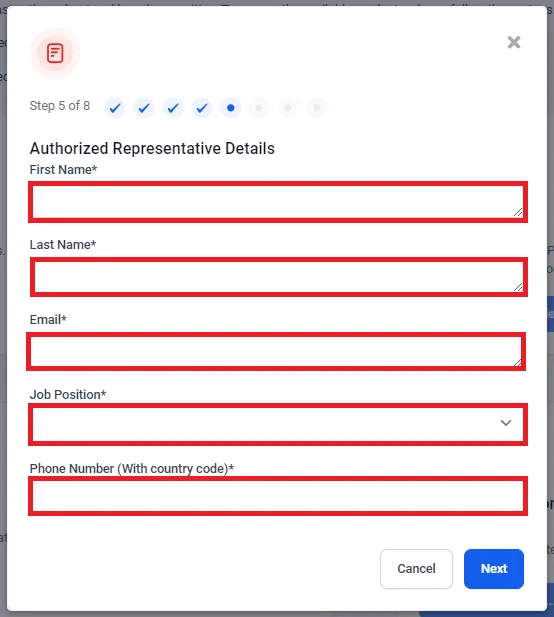
For the next two pages, you will be asked to confirm your business details. Ensure that every one of them is accurate and is filled with the correct, legal information. Starting with the business details.
Business Address,
Authorized Representative Details,
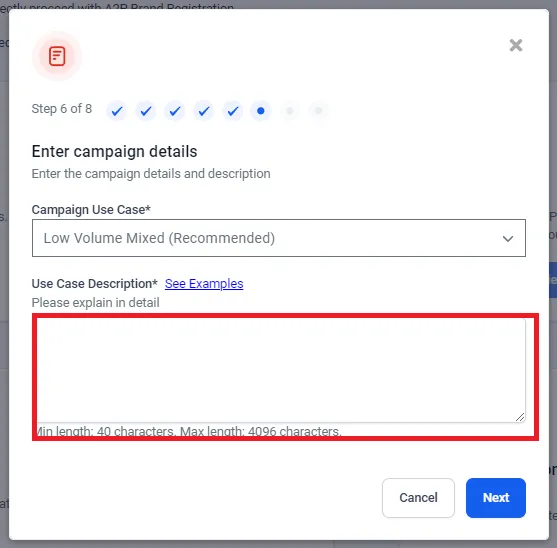
The campaign details differ from business to business. The Low Volume Mixed is recommended for the reason that it's a mix of everything. For example, if you select 2FA, you won't be able to send out messages other than for 2FA. So be very careful of selecting the use case. Likewise with the description, click on the 'See Examples' and see which one works best for your business.
RECOMMENDED TEXT:
This campaign sends appointment reminders, confirmation messages, marketing messages, follow-up messages, customer service messages, and similar communications to individuals who have opted in and given their explicit consent.
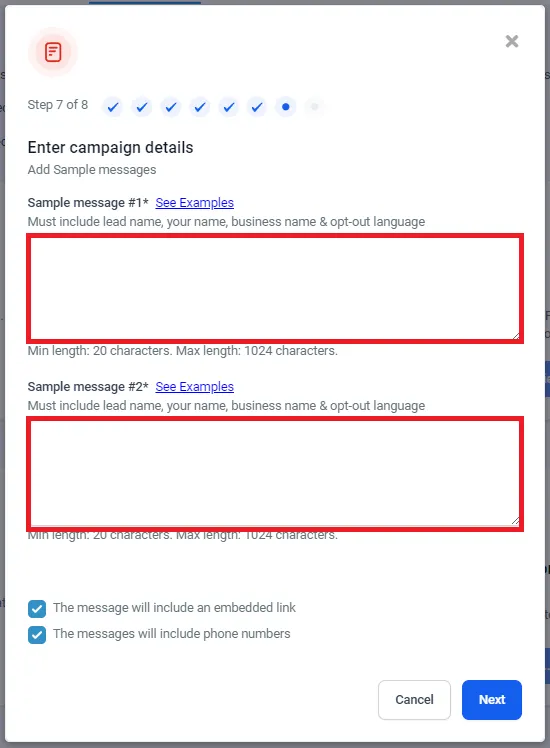
For Step 7, click on the 'See Examples' and select which one is best for you. Just copy and change the information.
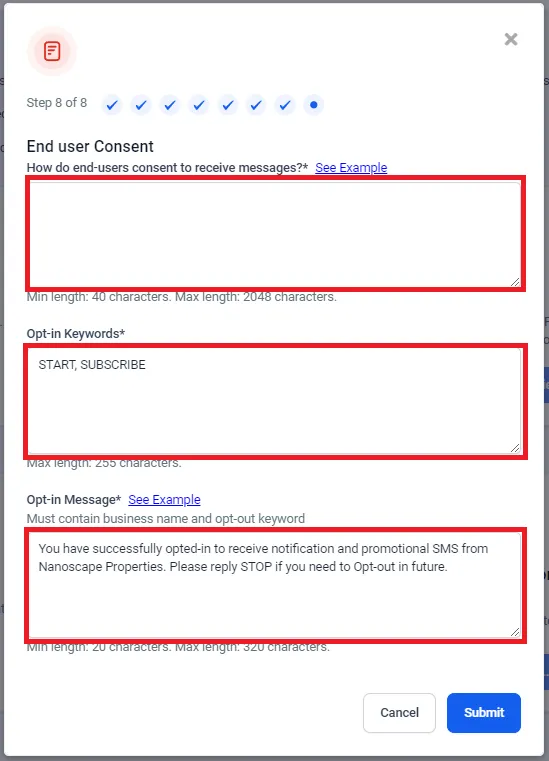
Finally for step 8, do the same for End user Content and Opt-in Message. The Opt-in Keywords don't need to be changed.
RECOMMENDED TEXT:
End users can opt-in by visiting “WEBSITE” and adding their phone number. They then check a box agreeing to receive text messages from “COMPANY NAME”. Additionally, end users can also opt-in by texting START to “PHONE NUMBER” to opt-in.
Opt-in Keywords Subscribe, Start
Opt-in Message (Must contain business name and opt-out keyword) You are successfully opted In for messages from “COMPANY NAME”. Reply STOP to unsubscribe.
Once finished, click 'Submit'. Bear in mind the process can take a day to a week. I urge you to check frequently in case it was rejected. In the case that it was rejected, you need to check the following:
Business Information
Website
Re-submit once you've made modifications and adhered to the instructions.

Need additional support? Feel free to reach out to be referred to an Elenore Expert!